
Left Hand Slurring Techniques
This lesson teaches left hand slurring techniques. A slur is the producing of a note artificially. The three most common types of slurs are the hammer-on, pull-off and slide.
The Hammer-on
The hammer-on produces a note artificially by hammering a finger of the left hand onto a string. The impact of the string against the fretboard will cause the string to sound the note of the hammered fret. In order to play the following example, first hold down the basic D chord. Lift the second finger off the first string.
Now play the open first string with the right hand i finger. As the note is sounding, hammer the second finger of the left hand back onto the second fret of the first string. If played correctly the note of the second fret will be produced. The hammer-on is indicated by a curved line and the symbol "H".


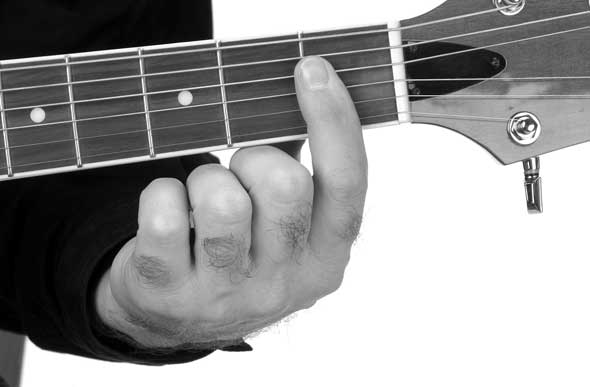
Hold D chord and lift second finger.

Hammer second finger onto 1st string, 2nd fret.
The off Beat Hammer-On
The off beat hammer-on requires picking a bass note and the first note of the hammer-on at the same time. The pinch of both notes will be on a beat of the bar but the hammered note is on the following off beat. Study the following example. In the first bar an alternating thumb style pattern is played over a D chord.
The second bar is very similar except a hammer-on is played. At the beginning of this bar lift the second finger of the fretting hand off the first string. Pinch the root bass note and the first string(open). This pinch is on the first beat of the bar. The second finger then hammers back onto the first string on the + immediately after the first beat. It is important to let the open string sound for a half a beat and hammer the finger onto the string precisely on the +.

The on Beat Hammer-On
The on beat hammer-on requires picking a bass note by itself and then picking the first note of the hammer-on immediately after on the following off beat. The hammered note is then played on the next on beat.
This type of hammer-on is a little more difficult because it is necessary to hammer the string at exactly the same time as the next bass note is played. Study the following example. In the first bar an alternating thumb style pattern is played over a D chord. The second bar is very similar except a hammer-on is played. At the beginning of this bar lift the second finger of the fretting hand off the first string. Play the first bass note of the second bar then play the open first string, remembering that this is the string that is normally played in this pattern. The second finger of the left hand then hammers back onto the first string at exactly the same time the right hand thumb plays the bass note on the second beat of the bar.

The next chord progression utilizes both the off beat and on beat hammer-ons. Practice the progression first using a basic alternating thumb style pattern. Once you are comfortable with the progression try adding the hammer-ons as notated.


The Pull-Off
This time a left hand finger is pulled away from the string after fretting the note. If played correctly, the action of the finger leaving the string will cause the string to sound. This technique is demonstrated next. In order to play example 57, first hold a basic Am chord. Play the second string, the first fret note(C) will sound.
Now pull the finger away from the string. If played correctly the note of the open second string(B) will be produced. The pulloff is indicated by a curved line and the symbol "P".


Hold the Am chord and pick the second string.

Pull the first finger away from the second string.
The Off Bear Pull-Off
The off beat pull-off involves picking a bass note and the first note of the pull-off at the same time. The pinch of both notes will be on a beat of the bar but the note that is produced by the pull-off is on the following off beat.
Study the following example. In the first bar an alternating thumb style pattern is played over an Am chord. The second bar is very similar except a pull-off is played. On the first beat of this bar the fifth and second strings are pinched together. The first finger then pulls away from the second string on the + immediately after the first beat. It is important to let the first note sound for a half a beat and pull the finger away from the string precisely on the +.

The on Beat Pull-Off
The on beat pull-off requires picking a bass note by itself and then picking the first note of the pull-off immediately after on the following off beat. The pull-off note occurs on the following on beat. The pull-off note is sounded exactly at the same time as the next bass note is played.
Study the following example. In the first bar an alternating thumb style pattern is played over an Am chord. The second bar is very similar except a pull-off is played. Pick the first bass note of the second bar, followed by the second string, remembering that this is the string that is normally played in this pattern. The first finger of the left hand then pulls away from the second string at exactly the same time the right hand thumb plays the bass note on the second beat of the bar.

Pull-offs are featured in the next example. Two new chords are introduced, Dsus and Esus.
Esus

Dsus


The Slide
After a note is played, the left hand finger fretting the note slides to another fret, maintaining the pressure on the string. The fretting finger must not lift off the string. If played correctly, the note will sound at the fret where the finger stops. This technique is demonstrated next.
To play example 61, hold a basic A chord shape one fret lower than normal at the first fret. Play the second string and then slide the entire chord shape to the normal A position at the second fret. The note at the second fret will be produced. The slide is indicated by a straight line and the symbol "S".

Hold A chord shape on first fret and pick second string.

Slide chord shape up to the normal A position.
The Off Beat Slide
The off beat slide involves picking a bass note and the first note of the slide together. This pinch is on a beat of the bar but the left hand finger that is fretting the string moves to the desired fret on the following off beat. In example 62 a pattern is played over an A chord.
The second bar is similar except a slide is played. On the first beat of this bar move the A chord shape back one fret and pinch the 5th and 2nd strings together. Slide the entire shape up to the normal A position on the + immediately after the first beat. It is important to let the first note sound for a half a beat before sliding precisely on the +.

The on Beat Slide
The on beat slide requires picking a bass note by itself and then picking the first note of the slide immediately after on the following off beat. The note produced by the slide occurs on the following on beat and is sounded exactly at the same time as the next bass note is played.
In example 63 a pattern is played over an A chord. The second bar is very similar except a slide is played. Pick the first bass note of the second bar and then move the A chord shape back one fret to the first fret. Pick the first string and slide the entire shape up one fret to the normal A position at exactly the same time the right hand thumb plays the bass note on the second beat of the bar.

A(alternative fingering)

Example 64 uses both types of slides introduced in the previous paragraphs. An important chord is also introduced, an alternative fingering for the A chord. This chord is played by barring your first finger across the first four strings. The chord can also be extended by adding the high A note on the fifth fret, first string, fretted with the 4th finger. It is only necessary to fret the high A note when it is needed.
G6


The Bass String Hammer-on
A hammer-on can also be played on the bass strings. This technique is demonstrated in the following example. In each bar of the following exercise, an open string is played on a beat of the bar, followed by a hammer-on on the following off beat. The left hand hammer-on is played at exactly the same time the next right hand picking note is played.

The next song, Red River Valley, is also a sixteen bar progression, using the chords G, G7, C, D and D7. First practice the melody and familiarize yourself with the chords.


The bass string hammer-on technique introduced earlier this lesson is featured throughout the following accompaniment.


